Field-expedient Weapons, Tools, and Equipment
As a soldier you know the importance of proper care and use of your weapons, tools, and equipment. This is especially
true of your knife. You must always keep it sharp and ready to use. A knife is your most valuable tool in a survival
situation. Imagine being in a survival situation without any weapons, tools, or equipment except your knife. It
could happen! You might even be without a knife. You would probably feel helpless, but with the proper knowledge
and skills, you can easily improvise needed items.
In survival situations, you may have to fashion any number and type of field-expedient tools and equipment to survive. Examples of tools and equipment that could make your life much easier are ropes, rucksacks, clothes, nets, and so on.
Weapons serve a dual purpose. You use them to obtain and prepare food and to provide self-defense. A weapon can
also give you a feeling of security and provide you with the ability to hunt on the move.
CLUBS
You hold clubs, you do not throw them. As a field-expedient weapon, the club does not protect you from enemy soldiers. It can, however, extend your area of defense beyond your fingertips. It also serves to increase the force of a blow without injuring yourself. There are three basic types of clubs. They are the simple, weighted, and sling club.
Simple Club
A simple club is a staff or branch. It must be short enough for you to swing easily, but long enough and strong enough for you to damage whatever you hit. Its diameter should fit comfortably in your palm, but it should not be so thin as to allow the club to break easily upon impact. A straight-grained hardwood is best if you can find it.
Weighted Club
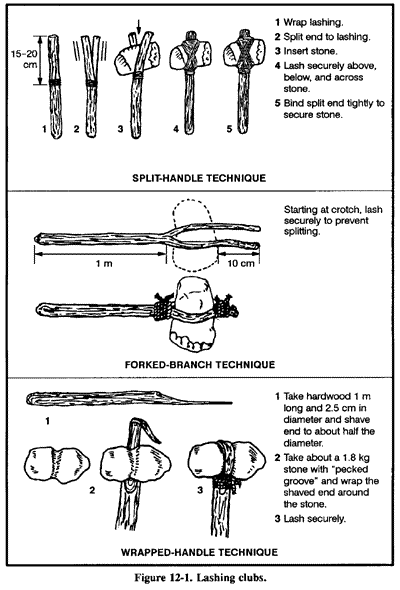
A weighted club is any simple club with a weight on one end. The weight may be a natural weight, such as a knot on the wood, or something added, such as a stone lashed to the club.
To make a weighted club, first find a stone that has a shape that will allow you to lash it securely to the club. A stone with a slight hourglass shape works well. If you cannot find a suitably shaped stone, you must
fashion a groove or channel into the stone by a technique known as pecking. By repeatedly rapping the club stone with a smaller hard stone, you can get the desired shape.
Next, find a piece of wood that is the right length for you. A straightgrained
hardwood is best. The length of the wood should feel comfortable in relation to the weight of the stone. Finally, lash the stone to the handle.
There are three techniques for lashing the stone to the handle: split handle, forked branch, and wrapped handle. The technique you use will depend on the type of handle you choose. See Figure 12-1.
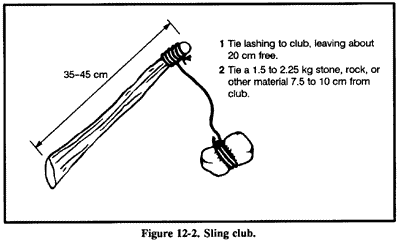
Sling Club
A sling club is another type of weighted club. A weight hangs 8 to 10
centimeters from the handle by a strong, flexible lashing (Figure 12-2).
This type of club both extends the user’s reach and multiplies the force of the blow.
EDGED WEAPONS
Knives, spear blades, and arrow points fall under the category of edged
weapons. The following paragraphs will discuss the making of such weapons.
Knives
A knife has three basic functions. It can puncture, slash or chop, and cut. A knife is also an invaluable tool used to construct other survival items. You may find yourself without a knife or you may need another type knife or a spear. To improvise you can use stone, bone, wood, or metal to make a knife or spear blade.
Stone
To make a stone knife, you will need a sharp-edged piece of stone, a chipping tool, and a flaking tool. A chipping tool is a light, blunt-edged tool used to break off small pieces of stone.
A flaking tool is a pointed tool used to break off thin, flattened pieces of stone. You can make a chipping tool from wood, bone, or metal, and a flaking tool from bone, antler tines, or soft iron (Figure 12-3).
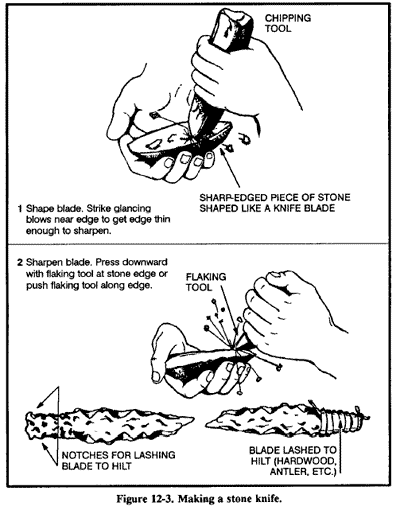
Start making the knife by roughing out the desired shape on your sharp piece of stone, using the chipping tool. Try to make the knife fairly thin. Then, using the flaking tool, press it against the edges. This action will
cause flakes to come off the opposite side of the edge, leaving a razor sharp edge. Use the flaking tool along the entire length of the edge you need to sharpen. Eventually, you will have a very sharp cutting edge that you can use as a knife.
Lash the blade to some type of hilt (Figure 12-3).
Note: Stone will make an excellent puncturing tool and a good chopping tool
but will not hold a fine edge. Some stones such as chert or flint can have very fine edges.
Bone
You can also use bone as an effective field-expedient edged weapon. First, you will need to select a suitable bone. The larger bones, such as the leg bone of a deer or another medium-sized animal, are best. Lay the bone upon another hard object. Shatter the bone by hitting it with a heavy object, such as a rock. From the pieces, select a suitable pointed splinter. You can further shape and sharpen this splinter by rubbing it on a rough-surfaced rock. If the piece is too small to handle, you can still use it by adding a handle to it. Select a suitable piece of hardwood for a handle and lash the bone splinter securely to it.
Note: Use the bone knife only to puncture. It will not hold an edge and it may flake or break if used differently.
Wood
You can make field-expedient edged weapons from wood. Use these only to puncture. Bamboo is the only wood that will hold a suitable edge. To make a knife using wood, first select a straight-grained piece of hardwood that is about 30 centimeters long and 2.5 centimeters in diameter. Fashion the blade about 15 centimeters long. Shave it down to a point. Use only the straight-grained portions of the wood. Do not use the core or pith, as it would make a weak point. Harden the point by a process known as fire hardening. If a fire is possible,
dry the blade portion over the fire slowly until lightly charred. The drier the wood, the harder the point. After lightly charring the blade portion, sharpen it on a coarse stone. If using bamboo and after fashioning the blade, remove any other wood to make the blade thinner from the inside portion of the bamboo. Removal is done this way because
bamboo’s hardest part is its outer layer. Keep as much of this layer as possible to ensure the hardest blade possible. When charring bamboo over a fire, char only the inside wood; do not char the outside.
Metal
Metal is the best material to make field-expedient edged weapons. Metal, when properly designed, can fulfill a knife’s three uses—puncture, slice or chop, and cut. First, select a suitable piece of metal, one that most resembles the desired end product. Depending on the size and original shape, you can obtain a point and cutting edge by rubbing the metal on a rough-surfaced stone. If the metal is soft enough, you can hammer out one edge while the metal is cold. Use a suitable flat, hard
surface as an anvil and a smaller, harder object of stone or metal as a
hammer to hammer out the edge. Make a knife handle from wood, bone, or other material that will protect your hand.
Other Materials
You can use other materials to produce edged weapons. Glass is a good alternative to an edged weapon or tool, if no other material is available.
Obtain a suitable piece in the same manner as described for bone. Glass
has a natural edge but is less durable for heavy work. You can also sharpen plastic—if it is thick enough or hard enough—into a durable point for puncturing.
Spear Blades
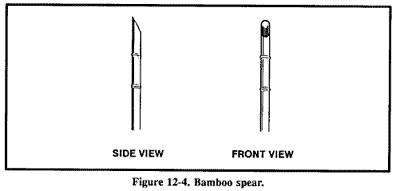
To make spears, use the same procedures to make the blade that you used to make a knife blade. Then select a shaft (a straight sapling) 1.2 to 1.5 meters long. The length should allow you to handle the spear easily and effectively. Attach the spear blade to the shaft using lashing. The preferred method is to split the handle, insert the blade, then wrap or lash it tightly. You can use other materials without adding a blade. Select a 1.2- to 1.5-meter long straight hardwood shaft and shave one end to a point. If possible, fire harden the point. Bamboo also makes an excellent spear. Select a piece 1.2 to 1.5 meters long. Starting 8 to 10 centimeters back from the end used as the point, shave down the end at
a 45-degree angle (Figure 12-4). Remember, to sharpen the edges, shave
only the inner portion.
Arrow Points
To make an arrow point, use the same procedures for making a stone knife blade. Chert, flint, and shell-type stones are best for arrow points. You can fashion bone like stone—by flaking. You can make an efficient arrow point using broken glass.
OTHER EXPEDIENT WEAPONS
You can make other field-expedient weapons such as the throwing stick, archery equipment, and the bola.
Throwing Stick
The throwing stick, commonly known as the rabbit stick, is very effective
against small game (squirrels, chipmunks, and rabbits). The rabbit stick itself is a blunt stick, naturally curved at about a 45-degree angle. Select a stick with the desired angle from heavy hardwood such as oak. Shave off two opposite sides so that the stick is flat like a boomerang (Figure 12-5). You must practice the throwing technique for accuracy and speed. First, align the target by extending the nonthrowing arm in line with the mid to lower section of the target. Slowly and repeatedly raise the
throwing arm up and back until the throwing stick crosses the back at about a 45-degree angle or is in line with the nonthrowing hip. Bring the
throwing arm forward until it is just slightly above and parallel to the
nonthrowing arm. This will be the throwing stick’s release point. Practice
slowly and repeatedly to attain accuracy.
Archery Equipment
You can make a bow and arrow (Figure 12-6) from materials available in your survival area. To make a bow, use the procedure described under Killing Devices in Chapter 8.
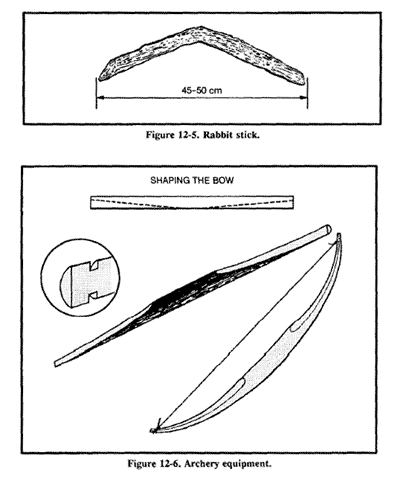
While it may be relatively simple to make a bow and arrow, it is not easy to use one. You must practice using it a long time to be reasonably sure that you will hit your target. Also, a field-expedient bow will not last very long before you have to make a new one. For the time and effort involved, you may well decide to use another type of fieldexpedient weapon.
Bola
The bola is another field-expedient weapon that is easy to make (Figure 12-7). It is especially effective for capturing running game or low-flying
fowl in a flock. To use the bola, hold it by the center knot and twirl it above your head. Release the knot so that the bola flies toward your target. When you release the bola, the weighted cords will separate. These cords will wrap around and immobilize the fowl or animal that you hit.

Survival Skills
Survival Actions
Psyhology of Survival
Survival Planning and Survival Kits
Survival Medicine
Survival Medicine - Requirements for Maintenance of Health
Survival Medicine - Medical Emergencies
Survival Medicine - Lifesavings Steps
Survival Medicine - Bone And Joint Injury
Survival Medicine - Bites and Stings
Survival Medicine - Wounds
Survival Medicine - Environmental Injuries
Survival Medicine - Herbal Medicines
Shelters
Shelters - Shelter Site Selection
Shelters - Types of Shelters
Water Procurement - Water Sources
Water Procurement - Still Construction
Water Procurement - Water Purification
Firecraft - Basic Fire Principles
Firecraft - Site Selection and Preparation
Firecraft - Fire Material Selection
Firecraft - How to Build a Fire
Firecraft - How to Light a Fire
Food Procurement - Animals for Food
Food Procurement - Traps and Snares
Food Procurement - Killing Devices
Food Procurement - Fishing Devices
Food Procurement - Preparation of Fish and Game for Cooking and Storage
Survival Use of Plants - Edibility of Plants
Survival Use of Plants - Plants for Medicine
Poisonous Plants
Dangerous Animals - Insects and Arachnids
Dangerous Animals - Poisonous Snakes
Dangerous Animals - Dangerous Lizards
Dangerous Animals - Saltwater Dangers
Field-expedient Weapons, Tools, and Equipment
Field-expedient Weapons - Lashing and Cordage
Field-expedient Weapons - Rucksack Construction
Field-expedient Weapons - Clothing and Insulation
Field-expedient Weapons - Cooking and Eating
Desert Survival - Terrain
Desert Survival - Environmental Factors
Desert Survival - Need For Water
Desert Survival - Heat Casualties
Desert Survival - Precautions and Desert Hazards
Tropical Survival - Tropical Weather
Tropical Survival - Jungle Types
Tropical Survival - Travel Through Jungle Areas
Tropical Survival - Immediate Considerations
Tropical Survival - Water Procurement
Tropical Survival - Food
Cold Weather Survival - Cold Regions And Locations
Cold Weather Survival - Basic Principles Of Cold Weather Survival
Cold Weather Survival - Hygiene and Medical Aspects
Cold Weather Survival - Cold Injuries
Cold Weather Survival - Shelters
Cold Weather Survival - Fire
Cold Weather Survival - Water
Cold Weather Survival - Food
Cold Weather Survival - Travel
Cold Weather Survival - Weather Signs
Sea Survival - The Open Sea
Sea Survival - Seashores
Expedient Water Crossings - Rivers and Streams
Expedient Water Crossings - Rapids
Expedient Water Crossings - Rafts
Expedient Water Crossings - Flotation Devices
Expedient Water Crossings - Other Water Obstacles
Field-expedient Direction Finding - Using the Sun and Shadows
Field-expedient Direction Finding - Using the Moon and the Stars
Field-expedient Direction Finding - Making Improvised Compasses
Field-expedient Direction Finding - Other Means of Determining Direction
Signaling Techniques
Signaling Techniques - Means For Signaling
Signaling Techniques - Codes and Signals
Signaling Techniques - Aircraft Vectoring Procedures
Survival Movement in Hostile Areas - Phases of Planning
Survival Movement in Hostile Areas - Execution
Survival Movement in Hostile Areas - Return to Friendly Control
Camouflage - Personal Camouflage
Camouflage - Methods Of Stalking
Contact With People
Contact With People - The Survivor’s Behavior
Survival In Man-made Hazards - The Nuclear Environment
Survival In Man-made Hazards - Biological Environments
Survival In Man-made Hazards - Chemical Environments